

Fill one chamber with a balanced mix of chopped green and brown materials, then tumble it regularly. The Miracle-Gro dual chamber compost tumbler works best when you build one batch before starting another. A well-balanced tumbler can reach about 140°F during active decomposition. Meanwhile, kitchen and garden waste represents roughly one-third of household waste in many composting discussions.
Key Takeaways
- Start with enough material to create an active composting core.
- Combine carbon-rich browns with nitrogen-rich greens throughout each batch.
- Cut large scraps into smaller pieces before loading the chamber.
- Keep the mixture moist like a squeezed sponge, never waterlogged.
- Fill only one chamber while the other chamber finishes curing.
- Turn the tumbler regularly to distribute oxygen and moisture.
Start With the Right Chamber Strategy
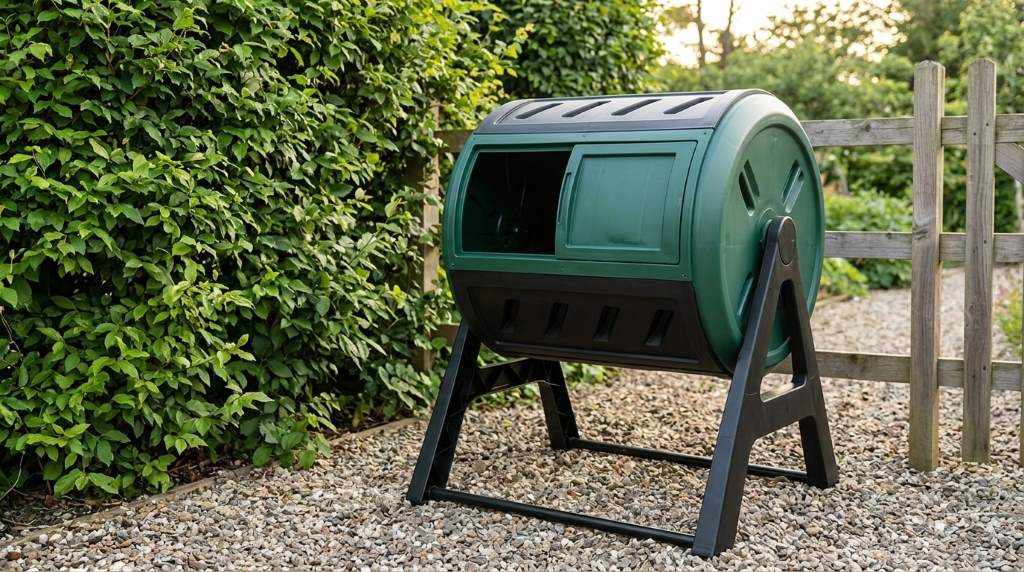
The biggest mistake involves treating both chambers like one large bin. Instead, use each chamber as a separate composting workspace with its own batch cycle.
Begin by filling Chamber One with fresh materials until it reaches the appropriate working level. Then stop adding fresh scraps and allow that batch to decompose.
Meanwhile, use Chamber Two for your next batch. This simple rotation lets you collect new waste without disturbing finished compost.
Why Separate Batches Work Better
Fresh scraps constantly introduce new moisture, oxygen demands, and decomposition stages. Consequently, adding fresh material to mature compost can restart parts of the decomposition process.
A batch approach creates more predictable conditions inside the chamber. It also makes finished compost easier to identify, remove, and use.
Prepare Materials Before Loading
Good compost begins before anything enters the tumbler. Sort your materials, remove unsuitable items, and reduce large pieces first.
Chop vegetable scraps into smaller pieces whenever practical. Smaller pieces expose more surface area, allowing decomposer organisms to work more efficiently.
Shred leaves instead of adding thick layers of whole leaves. Also cut long stems, dense stalks, and bulky garden debris into manageable pieces.
Choose Carbon-Rich Brown Materials
Brown materials supply carbon and help maintain structure inside the tumbler. They also absorb excess moisture from wetter kitchen scraps.
- Dry leaves
- Shredded cardboard
- Untreated paper
- Small twigs
- Dry grass or hay
- Untreated plant material
Keep a bag of dry shredded leaves beside the tumbler for quick adjustments. This reserve becomes especially useful when kitchen scraps make the mixture too wet.
Add Nitrogen-Rich Green Materials
Green materials provide nitrogen, which supports active microbial decomposition. However, too many wet greens can create odors and compact the mixture.
- Fruit and vegetable scraps
- Fresh grass clippings
- Green plant trimmings
- Coffee grounds
- Fresh weeds without mature seeds
Mix greens with browns rather than creating thick layers of either material. This approach distributes moisture and nutrients more evenly throughout the batch.
Build the Load in Balanced Layers
Do not dump every ingredient into the chamber in one wet pile. Instead, alternate different material types as you build the load.
Start with a layer of coarse brown material at the bottom. Next, add a moderate amount of chopped green material and cover it with additional browns.
Continue this pattern until the chamber reaches its recommended filling level. Finally, finish with a brown layer if the surface looks particularly wet.
A Practical Loading Pattern
- Add a layer of dry leaves or shredded cardboard.
- Add chopped fruit and vegetable scraps.
- Add another layer of dry brown material.
- Add grass clippings or green plant matter.
- Repeat until the chamber reaches the working level.
- Finish with additional browns when the mixture feels wet.
This method avoids creating isolated pockets of nitrogen-rich material. It also gives you a practical way to correct moisture while loading.
How Full Should the Chamber Be?
A tumbler needs enough material to develop an active decomposition zone. Starting with too little material can make heat development slower and less consistent.
However, completely packing the chamber can restrict movement and reduce effective aeration. Leave enough room for the contents to tumble freely.
For the dual-chamber design, treat each side as an independent batch. Fill one chamber to its practical working level, then let that batch mature.
Do not confuse maximum physical capacity with the ideal working load. The tumbler needs usable space for mixing and expansion during decomposition.
Get the Moisture Level Right
Moisture controls how effectively microorganisms can break down organic material. Too little moisture slows decomposition, while excess water reduces airflow.
Use the squeeze test before adding water. Grab a handful of composting material and squeeze it firmly.
- A few drops appear: moisture is probably adequate.
- No moisture appears: add a small amount of water.
- Water streams out: add more dry brown material.
Add water gradually rather than soaking the entire chamber. Then tumble the contents so moisture spreads through the material.
After mixing, check another handful from deeper inside the chamber. Surface material can look dry while the center remains excessively wet.
Know What Not to Put Inside
Good filling technique also requires knowing which materials should stay outside. Some materials create odors, attract pests, or interfere with safe composting.
- Meat and fish scraps
- Bones
- Greasy or fatty foods
- Pet waste
- Diseased plant material
- Plastic and synthetic packaging
- Glossy or heavily treated materials
- Caustic chemicals or household cleaners
When uncertain, leave questionable material out of the batch. A smaller clean batch usually produces better results than a contaminated mixture.
Use the Two Chambers as a Rotation System
The dual-chamber design becomes especially useful when you stop filling both sides simultaneously. Think of the chambers as alternating production lines.
| Chamber | Primary Job | What You Do |
|---|---|---|
| Chamber One | Active batch | Fill, balance, moisten, and tumble |
| Chamber Two | New batch | Collect and build fresh ingredients |
Once Chamber One finishes, empty the finished compost and restart that chamber. Then move your attention toward the second chamber.
This rotation creates a continuous composting workflow without repeatedly disturbing mature material. It also makes household food-scrap management much easier.
Turn the Tumbler Correctly
Turning distributes oxygen, moisture, microorganisms, and different material types throughout the batch. However, excessive turning can unnecessarily disturb the decomposition process.
Rotate the tumbler regularly during active decomposition. Use smooth, controlled rotations rather than aggressively spinning the barrel.
Check the mixture after turning if the chamber feels unusually heavy or compacted. Add dry browns when wet clumps remain stuck together.
When Should You Stop Adding Materials?
Stop adding fresh ingredients once the chamber reaches its working load. Let that batch continue decomposing without repeatedly introducing new waste.
Adding fresh scraps too late creates different decomposition stages inside one batch. Therefore, the finished compost can take longer to become uniform.
Signs Your Compost Mix Needs Correction
Your tumbler communicates problems through smell, texture, and temperature. Learn these signs before making large changes.
| Problem | Likely Cause | Practical Fix |
|---|---|---|
| Strong unpleasant odor | Too many greens or excess moisture | Add dry browns and tumble thoroughly |
| Mixture stays cold | Too little material or nitrogen | Add suitable green material and mix |
| Mixture looks dusty | Insufficient moisture | Add water gradually and tumble |
| Wet compacted clumps | Excess moisture or poor structure | Add dry leaves and mix thoroughly |
| Large pieces remain | Material entered without preparation | Break or chop future additions smaller |
What to Do When the Tumbler Smells Bad
A strong rotten smell usually indicates an imbalance rather than a failed tumbler. Excess moisture and nitrogen commonly create oxygen-poor conditions.
First, add a generous amount of dry brown material. Then rotate the barrel several times to distribute the corrective material.
If the mixture remains wet, add more dry leaves and wait before adding additional kitchen scraps. Avoid adding water until the moisture level improves.
How to Speed Up Decomposition Naturally
Fast composting depends on conditions rather than a single secret ingredient. Focus on particle size, moisture, oxygen, material balance, and sufficient volume.
Chop large scraps before loading them into the chamber. Also maintain enough brown material to prevent wet greens from forming dense pockets.
Keep the tumbler in a location that receives useful sunlight and avoids excessive exposure to harsh conditions. Warmer surroundings can support stronger microbial activity.
Do Not Chase Heat Alone
A warm batch often indicates active decomposition, but temperature does not tell the entire story. Compost can still mature when conditions fluctuate.
Instead, monitor several indicators together. Look for steady breakdown, an earthy smell, balanced moisture, and increasingly uniform texture.
How to Know When the Compost Is Ready
Finished compost should look dark, crumbly, and relatively uniform. You should also notice a pleasant earthy smell rather than a sharp food odor.
Original ingredients should become difficult to recognize. A few stubborn woody pieces can remain and usually need additional time.
Once the batch reaches maturity, remove the finished compost from the chamber. Leave a small amount behind to help seed the next batch.
Common Filling Mistakes to Avoid
Many composting problems begin during loading rather than later. Correcting the filling process often solves recurring issues faster than adding products.
- Filling with only kitchen scraps
- Adding large uncut food pieces
- Using thick layers of fresh grass
- Overwatering the chamber
- Ignoring dry brown materials
- Overfilling the barrel
- Adding unsuitable waste
- Continuously disturbing a finished batch
Most of these mistakes create predictable problems with airflow, moisture, or decomposition speed. A balanced initial load prevents many corrections later.
A Simple First-Batch Formula
If you are filling your tumbler for the first time, keep the process deliberately simple. Gather several types of browns and greens before opening the chamber.
Begin with dry leaves, then add chopped vegetable scraps and another layer of dry material. Continue alternating until you reach a practical working level.
Check moisture using the squeeze test before closing the chamber. Finally, tumble the mixture enough to distribute the ingredients without compacting them.
Afterward, monitor the batch rather than constantly opening it. Make small corrections only when smell, moisture, or texture indicates a genuine imbalance.
Frequently Asked Questions
How much should I put in a Miracle-Gro dual chamber tumbler?
Fill one chamber to its practical working level while leaving enough space for the material to tumble freely.
Can I fill both chambers at the same time?
You can, but alternating batches works better because one chamber can mature while the other receives fresh scraps.
Should I add water when filling the compost tumbler?
Add water only when the mixture feels too dry, and always distribute moisture through thorough tumbling.
Why does my compost tumbler smell bad?
A bad smell usually signals excess moisture, too many greens, poor airflow, or unsuitable ingredients.
Can I keep adding scraps to finished compost?
No, stop adding fresh scraps once a batch reaches its working load so mature compost can finish properly.
Final Thoughts
Filling a Miracle-Gro dual chamber compost tumbler works best when you manage balance instead of simply adding waste. Prepare smaller pieces, combine browns with greens, maintain proper moisture, and give each batch enough room to work.
Most importantly, use the two chambers as a rotation system. Start your next batch while the previous one matures, then repeat the cycle throughout the growing season.
Start with a manageable first batch today, monitor its moisture and texture, and make small corrections when necessary. With consistent loading habits, your tumbler can turn everyday organic waste into useful homemade compost.
