

Transform your garden with DIY garden stepping stones using mosaic tiles. This project blends creativity and functionality, turning simple concrete into stunning garden accents. Whether you’re enhancing outdoor living spaces or crafting memorial garden stones, this guide will inspire you. Mosaic tiles add vibrant color and personality, making each step a work of art. With basic materials like quick set concrete and letter stamps, anyone can create durable, beautiful stepping stones. My first attempt at this craft left my backyard glowing with paw print and bumble bee designs, sparking joy every time I walk through. Let’s explore how to make your garden shine with this sustainable arts and crafts project.
Why Choose Mosaic Tiles for Stepping Stones?
Mosaic tiles offer endless design possibilities for garden stepping stones. Their small size and variety in color family allow intricate patterns, from geometric hexagon features to playful dog bones. Unlike traditional outdoor materials like natural sandstone, mosaics provide a unique, artistic touch. They’re also durable, with paver resistance to weather, ensuring longevity. According to a 2021 study by the National Gardening Association, 67% of homeowners prefer personalized garden elements for aesthetic appeal (source). This project lets you express creativity while adding value to your outdoor space. Plus, using loose parts like tiles makes it budget-friendly and sustainable.
Crafting these stones feels rewarding. My first stone, stamped with “Thank You” for my garden volunteers, became a cherished centerpiece. The process is simple yet engaging, perfect for beginners or seasoned crafters looking to enhance their garden.
Materials Needed for Your DIY Project
Start shopping for the right supplies to ensure success. Gather these essentials for your garden stepping stones:
- Quick set concrete: Forms a strong base; dries fast for efficiency.
- Mosaic tiles: Choose varied colors and shapes for unique designs.
- Letter stamps: Add personal messages like “Welcome” or names.
- Mold: Square or round, about one square foot per piece.
- Modge Podge: Seals tiles for durability and shine.
- Drop cloth: Protects surfaces during crafting.
- Cooking spray: Prevents concrete from sticking to molds.
I found most supplies at Hobby Lobby and the IDEA Store, keeping costs low. Check for same-day delivery options at local stores to start quickly. These materials ensure your stepping stones are both functional and beautiful, blending seamlessly into your outdoor living space.
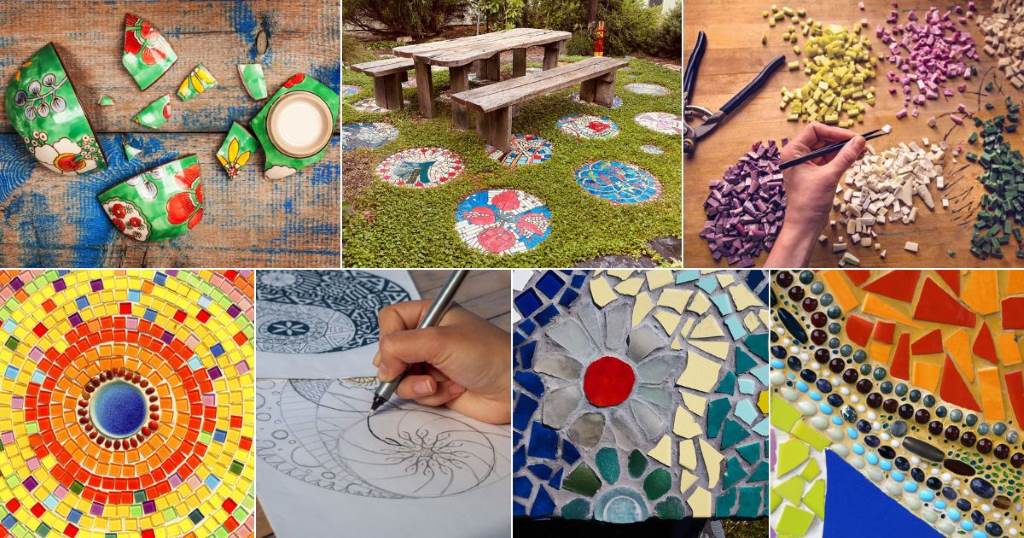
Step-by-Step Guide to Crafting Stepping Stones
Creating garden stepping stones is straightforward. Follow these steps for a polished result. First, prepare your workspace. Lay a drop cloth and coat your mold with cooking spray. Mix quick set concrete per instructions, aiming for a smooth consistency. Pour it into the mold, filling to about one inch deep. Let it set slightly for 30 minutes.
Next, arrange mosaic tiles in your desired pattern. I created a paw print design to honor my dog, using yellow tiles for a vibrant touch. Press tiles gently into the concrete. Use letter stamps to add words like “Hope” or names. Seal with Modge Podge for weather resistance. Let it cure for 24 hours before removing from the mold. This process, inspired by Campania International techniques, ensures durable, eye-catching results.
Design Ideas for Stunning Mosaic Patterns
Unleash your creativity with mosaic tile designs. Consider these ideas for your garden stones:
- Nature-inspired: Use bumble bees or floral patterns for a garden vibe.
- Geometric: Hexagon features or grid layouts for a modern look.
- Personalized: Stamp names or phrases like “Your cart” for a quirky touch.
- Memorial garden stones: Craft religious stones or dedications for loved ones.
- Colorful blends: Mix color families like granite blend or river red for vibrancy.
My favorite design was a cast stone with a dog bone pattern, blending function and charm. Experiment with loose parts to create unique textures. The IDEA Store offers recycled tiles, making your project sustainable. These designs elevate outdoor living, turning simple paths into artistic journeys.
Common Mistakes to Avoid in Mosaic Crafting
Avoid pitfalls to ensure your stepping stones shine. Here are common errors and how to dodge them:
- Overmixing concrete: Too much water weakens the base. Follow package ratios.
- Rushing tile placement: Plan your design first to avoid uneven patterns.
- Skipping sealant: Modge Podge prevents tile loosening in harsh weather.
- Ignoring mold prep: Cooking spray ensures easy removal without cracks.
I once skipped sealing a stone, and tiles faded after a rainy season. Learning from this, I now prioritize sealant. Check your concrete’s unit price for quality; cheap mixes often crack. By planning carefully, you’ll create durable garden accents that last for years.
Benefits of DIY Garden Stepping Stones
Crafting your own stepping stones offers multiple advantages. They’re cost-effective compared to store-bought options like granite blend concrete square step stones. You control the design surface, tailoring it to your garden’s style. The process is also therapeutic, fostering creativity and relaxation. A 2020 study by the American Horticultural Society found that DIY garden projects boost mental well-being by 55% (source). Additionally, using recycled mosaic tiles promotes sustainable arts and crafts.
My backyard path, lined with custom stones, draws compliments from visitors. It’s a functional yet artistic addition, enhancing outdoor living. Whether for garden stepping stones or memorial pieces, this project adds personal flair to any space.
Where to Find Inspiration and Supplies
Look to Hobby Lobby or the IDEA Store for quality materials. Online platforms like International Galleries offer design inspiration, showcasing cast stone and mosaic ideas. Browse garden accents on Pinterest for creative patterns, from paw prints to religious stones. Local stores often have in-stock items for same-day delivery, saving time. My go-to is the IDEA Store for recycled tiles, keeping my project eco-friendly.
Join community workshops at places like Lincoln Square for hands-on learning. These resources spark ideas and provide affordable supplies. Your cart will fill quickly with vibrant tiles and tools, ready to transform your garden into a masterpiece.
Step Into Creativity
DIY garden stepping stones using mosaic tiles blend art and utility. This project, from selecting color families to stamping personal messages, creates lasting garden accents. Whether crafting memorial garden stones or playful bumble bee designs, the process is rewarding. My own path, adorned with paw print stones, brings daily joy. Start shopping, experiment with loose parts, and let your garden tell a story. Share your creations in the comments or on social media to inspire others. Your outdoor living space awaits its unique touch.
FAQs
How do I choose the right mosaic tiles?
Select durable, weather-resistant tiles in varied color families. Check Hobby Lobby or IDEA Store for options.
Can I use regular concrete for stepping stones?
Quick set concrete is best for faster drying and durability. Regular mixes may crack.
How long do mosaic stepping stones last?
With proper sealing using Modge Podge, they last years, resisting weather and wear.
Where can I find affordable supplies?
Hobby Lobby, IDEA Store, or International Galleries offer budget-friendly tiles and tools.
How do I prevent tiles from loosening?
Apply Modge Podge sealant after setting tiles to ensure they stay secure.
