

Growing luffa sponges is a rewarding journey. It transforms tiny seeds into natural, biodegradable sponges. As a gardener, I was fascinated by the luffa plant’s dual role as both a vegetable and a scrubbing tool. This guide shares my experience and practical steps to cultivate luffa, also known as sponge gourd, from seed to harvest. You’ll learn how to nurture this vining plant, tackle challenges like powdery mildew, and process mature gourds into eco-friendly loofah sponges. Whether you’re a beginner or a seasoned gardener, this article will educate, demonstrate, and fascinate you with the wonders of luffa. Let’s dive into the process and grow your own sustainable scrubbers.
Choosing the Right Luffa Seeds for Planting
Selecting quality luffa seeds is the first step to a successful harvest. Luffa plants, like Luffa aegyptiaca or Luffa cylindrica, thrive in warm climates, ideally Zones 6 or higher. I learned this when I ordered seeds from a local supplier, only to discover some were mislabeled. Always buy from reputable sources like Seeds Now to ensure high germination rates. According to a study by the University of Arizona Master Gardeners, well-sourced seeds can achieve up to 85% germination success (source).
Check seed packets for variety details, as Luffa acutangula grows faster but yields smaller sponges. Store seeds in a cool, dry place to maintain viability. My first batch suffered from poor storage, leading to low sprouting. Opt for fresh, organic seeds to boost your chances of growing healthy loofah plants.
Preparing the Soil for Luffa Plants
Luffa plants crave moist, well-drained, rich soil. I started with a garden bed enriched with peat-free organic compost, like Melcourt Sylvamix, to ensure proper drainage. Test your soil’s pH—it should be between 6.0 and 6.8 for optimal growth. Add coconut coir or Fertile Fibre to improve texture if needed. My first attempt failed due to heavy clay soil, which suffocated the roots.
Before planting, till the soil to a depth of 12 inches. Mix in liquid fertilizer, such as fish emulsion, to provide nutrients. Ensure the area gets full sun, as luffa thrives in bright light. A well-prepared garden bed sets the stage for strong vining plants, reducing issues like downy mildew later.
Starting Luffa Seeds Indoors for Success
Luffa seeds need warmth to germinate, ideally 70–85°F. I used a heat mat and seed starting mix in small plant pots to kickstart growth. Soak seeds for 24 hours to boost germination rates. Plant them ½ inch deep in a propagator box to maintain humidity. My first try without a heating mat led to slow sprouting.
Place pots under grow lights for 14–16 hours daily. Keep the seed compost moist but not soggy. Within 7–14 days, seedlings emerge. Harden off seedlings by gradually exposing them to outdoor conditions over a week. This prevents shock when transplanting to the garden bed, ensuring robust luffa plants.
Transplanting Luffa Seedlings to the Garden
Transplant luffa seedlings after the last frost, when soil temperatures reach 65°F. I made the mistake of planting too early, losing half my crop to cold. Space plants 3–4 feet apart in rows, as luffa is a climbing plant needing room to spread. Use galvanised wires or a trellis for support, as I did after my vines collapsed under their weight.
Dig holes twice the size of the root ball. Mix in compost to enrich the soil. Water thoroughly after planting. Cover with a row cover to protect from cucumber beetles and other pests. This step ensures your luffa plants establish strong roots, setting them up for a productive growing season.
Caring for Luffa Plants During Growth
Luffa plants require consistent care. Water deeply once a week, ensuring the soil stays moist but well-drained. I learned to check soil moisture with my finger to avoid overwatering. Apply liquid fertilizer every two weeks to support yellow flowers and fruit development. A trellis or garden covers help manage sprawling vines.
Watch for powdery mildew, a common issue in humid climates. Remove affected leaves and improve air circulation. Hand pollinate female flowers if pollinating insects are scarce—use a small brush to transfer pollen. My first season taught me that neglecting pollination led to fewer gourds. Regular care keeps luffa plants thriving.
Managing Pests and Diseases in Luffa Plants
Pests like cucumber beetles and diseases like downy mildew can harm luffa plants. I noticed beetles chewing leaves early in my second season. Use row covers to block pests and check plants weekly. For mildew, ensure good air circulation and avoid overhead watering. A 10% bleach solution can clean tools to prevent disease spread.
Organic solutions work best. Neem oil repels beetles, while a baking soda spray curbs mildew. A 2019 study from McHenry County College found neem oil reduced beetle damage by 60% (source). Monitor plants closely, especially during hot, humid weather, to catch issues early and maintain healthy luffa growth.
Harvesting Luffa Gourds at the Right Time
Harvest luffa gourds when they turn brown and feel lightweight, typically 120–150 days after planting. I waited too long my first year, and the gourds rotted. Cut gourds with a sharp knife, leaving a short stem. The harvesting stage is critical to ensure the fibrous interior is ready for processing into loofah sponges.
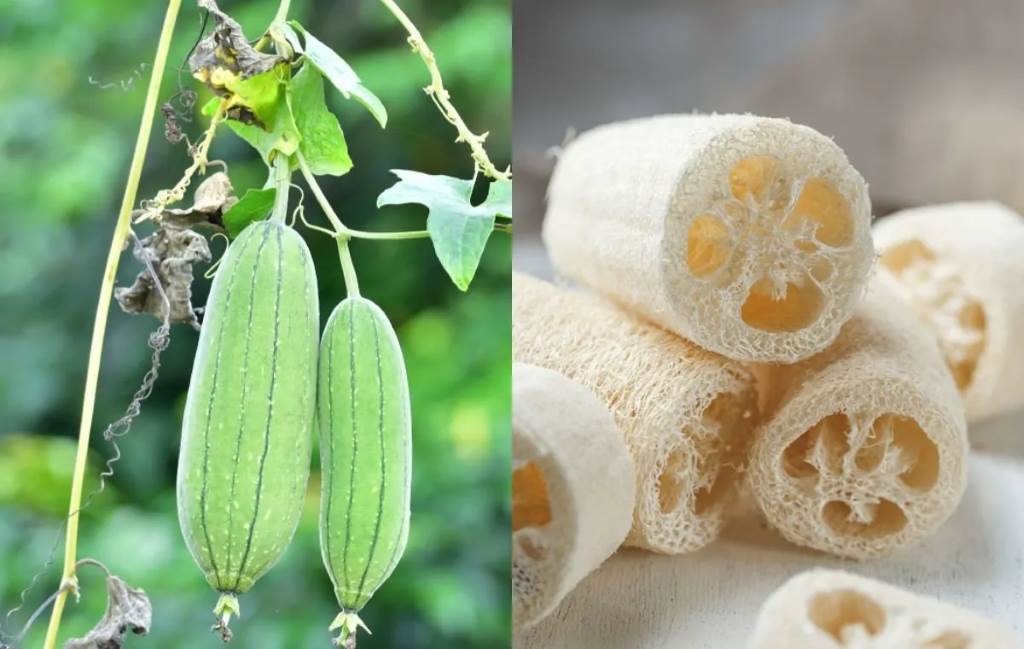
Shake the gourd—if seeds rattle, it’s ready. Mature gourds have a fibrous tissue skeleton perfect for scrubbing dishes or exfoliating. If gourds are still green, they’re edible as summer squash, like an Inca cucumber. Timing the harvest correctly ensures high-quality, biodegradable sponges.
Processing Mature Gourds into Loofah Sponges
Processing luffa gourds into sponges is simple yet rewarding. Peel off the dry, brown skin to reveal the fibrous insides. I soaked my gourds in warm water to ease peeling. Shake out loose seeds for next season’s planting. Rinse the fibrous inner husk in a mild bleach solution to remove residue.
Dry the sponge in full sun for a day. The result is a durable, eco-friendly loofah sponge, perfect for vegetable scrubbers or exfoliating power. My first batch was a hit at a local market, replacing plastic sponges. Store processed sponges in a large plastic box to keep them clean and ready for use.
Tips for Growing Luffa Sponges Successfully
- Use a heat mat: Boost germination rates with consistent warmth.
- Trellis early: Support climbing plants to prevent vine collapse.
- Hand pollinate: Ensure fruit set if bees are scarce.
- Monitor pests: Check weekly for cucumber beetles or mildew.
- Harvest promptly: Pick gourds when brown to avoid rot.
These tips, learned through trial and error, simplify the process. I wasted a season ignoring trellising, but a sturdy setup made all the difference. Follow these steps to grow robust luffa plants and enjoy sustainable sponges.
Common Mistakes to Avoid When Growing Luffa
- Planting too early: Cold soil stunts growth or kills seedlings.
- Poor soil prep: Skip compost, and plants struggle.
- Ignoring pests: Cucumber beetles can destroy crops quickly.
- Overwatering: Soggy soil invites root rot and mildew.
- Late harvesting: Delayed harvest leads to unusable gourds.
I fell into the overwatering trap, thinking more was better. The result was weak plants. Avoid these pitfalls by planning ahead and monitoring conditions. Proper care ensures a bountiful luffa harvest.
Why Luffa Sponges Are Worth Growing
Luffa sponges are sustainable alternatives to plastic sponges. They’re biodegradable, cost-effective, and versatile for scrubbing dishes or exfoliating skin. Growing them connects you to nature, as I felt when sharing my first batch with friends. The process is educational, teaching patience and care.
Additionally, luffa plants beautify gardens with yellow flowers and lush vines. They attract pollinating insects, boosting biodiversity. Unlike commercial sponges, homegrown loofahs are chemical-free. The effort pays off with eco-friendly products and a sense of accomplishment.
Embrace the Luffa Journey
Growing luffa sponges from seed to harvest is a fulfilling adventure. From selecting quality luffa seeds to processing mature gourds, each step teaches valuable gardening skills. My journey with luffa transformed my backyard into a sustainable haven, replacing plastic sponges with biodegradable ones. Despite challenges like powdery mildew or cucumber beetles, the rewards are worth it. Start your luffa garden today and enjoy the fruits of your labor. Share your experience in the comments or spread this guide to inspire others!
FAQs
How long does it take to grow luffa sponges?
Luffa takes 120–150 days from seed to harvest, depending on climate and care.
Can luffa plants grow in containers?
Yes, use large grow bags with trellis support for climbing plants.
How do I know when to harvest luffa gourds?
Harvest when gourds turn brown, feel light, and seeds rattle inside.
Are luffa sponges safe for skin exfoliation?
Yes, their fibrous tissue skeleton is gentle yet effective for exfoliating power.
What pests commonly affect luffa plants?
Cucumber beetles and powdery mildew are common; use row covers and neem oil.
References:
- University of Arizona Master Gardeners: https://extension.arizona.edu/master-gardener-program
- McHenry County College: https://www.mchenry.edu/master-gardeners
